Chapters

Introduction

This ultimate guide to playing pool is based on a series of coaching videos we did with 4x world champion pool player Gareth Potts. This is the most comprehensive guide on the web with videos and additional resources. You can check out our pool tables page for more of Gareth's videos from the several coaching and training days we've had with him.

Chapter 1: How To Expertly Hold A Cue For Perfect Accuracy

There are many ways to hold a pool cue, very similar to writing or your swing arm in tennis, golf or cricket. Everyone has a preference on how they like to hold/swing things. There is no right and wrong but there are ways to optimise the way you can hold a cue to ensure you hit the best shot each and every time.

Releasing a cue can be tricky and many people do this wrong. The most common mistake is that players will hold the back of the cue very tight-gripped, what this does is restrict how far back you can pull your arm thus decreasing your power. In this guide by Gareth Potts (video below) he demonstrates there are two ways to increase power when holding the cue. Firstly you need to make sure you have a loose grip with you back hand, what this does is it enables you to move your arm and elbow further back to generate more power on the follow through.

The two ways of releasing a the cue with your back hand are as follows:

  • You release your front 2 fingers as you pull back
  • You release your back two/three fingers as you pull back

Once you’ve got your preference you re-grip as you follow through with the shot. An example is Ronnie O’Sullivan prefers to release the front two fingers as he pulls back whilst Gareth Potts prefers to release the back two/three fingers as he pulls back.

The key point you need to take in from this chapter is that your back hand grip should be natural and loose so you have a further range of motion and make sure you re-grip on the follow through. Most amateurs will grip the cue as hard as possible and try and unleash as much power through that as possible. Their range is limited and thus their power generated will be lower. For delicate shots, power has less of an importance with technique increasing in importance. You should hold the cue a hand's length down the shaft from the back. This gives you a more compact shot.

Video Guide:

Additional Resources:

Billiards Basics - by Art of Manliness

How To Use Proper Pool Cue Grip - by Billiards & Pool

Improve Your Cue Action - by Billiards Boutique

A Proper Cue Stick Grip, Do It Right - by Billiards.About

Chapter 2: How To Bridge Properly

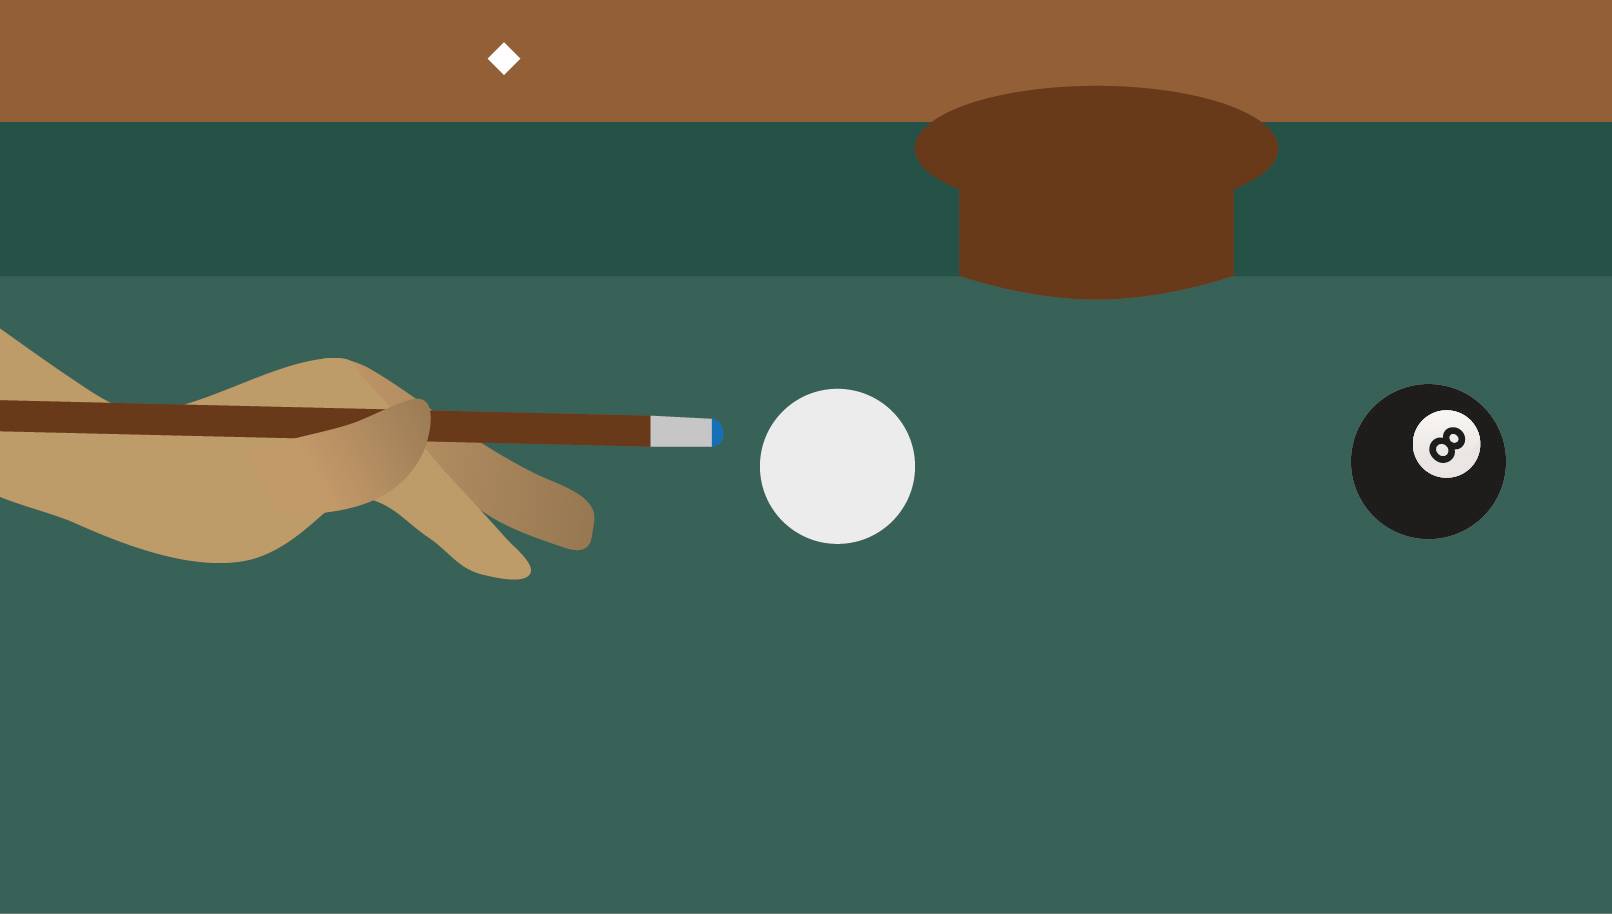
Bridging is often overlooked when players look at taking a shot. Most amateurs will just put the cue on their hand and hit the ball. Many don’t see the hand as an anchor but just something that’s necessary to do. Your mindset needs to change when it comes to bridging correctly.

Your hand should be thought of as an anchor, it should not move. The cue needs to rest on your hand which should be a solid platform. This platform then allows you to have the most stable shot. Your thumb should always be pressed against your first finger, this creates the V shape for the cue to rest in. Your palm should always be pressed and anchored into the table. Once you have this set up you can 100% focus on your cue action for the perfect shot.

Top-Spin

To hit a top-spin shot your bridge hand should be raised at the front, knuckles up to do this. Your palm should always remain flat and anchored. This lift in your hand means the cue will be aligned with the top of the cue ball ready to hit it for a top-spin shot.

Centre Shot

Your bridge hand should be slightly raised with your knuckles pushing slightly up. Make sure the cue tip is aligned with the centre of the ball to give you that nice clean shot.

Back-Spin

Your bridge hand should be as flat as possible. Your knuckles and palm should be flat with your palm anchored into the table. The more backspin you want to generate the flatter you want your hand. Many players tend to chip the ball when trying a back-spin shot. The reason this happens is because the bridge hand is raised too high, make sure this doesn't happen when you go for a back-spin shot.

The Loop Bridge

The loop bridge is used by American players. This is when the cue is put between the index and the 2nd finger to create that “loop”. The reasons English pool players don’t use this style of bridging is due to the different designs in English and American pool cues. Here are the differences:

  • The American cue has the same shaft thickness from tip to centre of the cue
  • The English cue has a tapered design, the cue gets thinner at the shaft as it goes down towards the cue tip

The American cue can be controlled using the loop bridge as the gap between the fingers (the loop) is constant as you pull the cue back and follow through. If you use an English cue and do this, as you pull back and follow through gaps will be created and the cue will move slightly and won’t give you the accurate shot you first planned. This is due to the cue having different thickness between tip and the centre of the cue.

Video Guide:

Additional Resources:

The Bridge - by Easy Pool Tutor

Bridges - by Billiard World

How To Bridge - by Billiards Colostate

The Proper Hand Bridge - by Pool Dawg

Chapter 3: How To Perfect Your Cue Action

Cue action and timing is one of the most important elements in pool. Pool is very similar to Golf in that timing is what makes a great player and not how hard you can hit the ball.

Feathering

First of all, everyone has a different feathering technique. Feathering is the pulling and pushing of the cue before taking a shot, the “line up”. It’s always recommended that you pause at the cue ball (the cue tip being a few millimetre away from the ball) and pause at the end of your pull back. The reasons behind this feathering technique are as follows:

  • Improves accuracy
  • You can control the acceleration of the shot
  • It improves your timing
  • It takes away the backwards momentum from the pull back
  • It gives your shot more structure instead of one continuous movement

Many of the top players like Ronnie O’Sullivan always have long pauses at the cue ball and on the pull back. Ronnie can get the cue ball to back-spin the length of a snooker table with minimal power. This proves the importance of timing and technique.

Video Guide:

Additional Resources:

Cue Action Mechanics - by Snooker Delight

Improve Your Cue Action - by Billiards Boutique

Ronnie O'Sullivan Cue Action Tips - by BBC

Chapter 4: How To Perfect Your Stance For Precision Accuracy

Do not overlook your stance and how you address a shot. This example will be based on someone who is right handed, simply reverse if you’re left handed.

Firstly align yourself with the shot correctly, look at the cue ball and get in the right position standing at the table. You must then anchor your right leg to the ground and lock it. Your foot should be pointing towards the shot. Once this is done, step forward with your left leg towards the shot. Your left leg should have a slight bend as this will enable you to adjust your body height and angle for the shot. You should keep your right leg locked and stable.

This stance will give you stability and freedom to adjust your body for shots. If you address each shot like this you’re giving yourself the best chance of hitting the perfect shot. Here are the steps again:

  • Lock the right leg and have it pointing towards the shot
  • The left leg then steps forward walking into the shot
  • Your right leg is now planted and locked and your left leg is slightly bent in position
  • Bend down and adjust your body for the shot
  • Hit the cue ball

Video Guide:

Additional Resources:

The Classic Stroke & Stance - by Billiards.about

5 Pool Billiards Stance - by Easy Pool Tutor

The Stance - by Billiards Colostate

The Proper Stance - by Billiards.com

Chapter 5: How To Break To Win

The break is probably the most important part of the game. A successful break puts you on the front foot. Several players place the ball in different areas. The best way to do it is to make sure you don’t put the ball too close to the cushion as this doesn’t give you maximum distance to generate power. Some top players like hitting it on a slight angle whilst others at the front on. The important point here is to make sure you hit the cue ball in the middle or just below the middle. This takes away the topspin which reduces power and gives you a better break.

Amateurs don’t think much of the break, they pull and hit as hard as possible. It’s important to push the cue through the cue ball as far as you can, this generates the maximum amount of power. Many people stop the cue once they hit the cue ball, this drastically reduces the power of your shot. The way you set up the balls at the start of the match is also important. Make sure all balls are touching, this means that the force generated by the impact of the cue ball can transfer through to each ball and give you the best split. Often you see people remove the triangle and nudge the balls, always pull the back off first whilst keeping the front of the triangle down. You then slowly remove the triangle without touching the balls, this keeps them touching. Push the balls forward in the triangle if they’re not touching.

Video Guide:

Additional Resources:

How To Properly Break In Pool - by Gear Patrol

Tips For Smashing The Rack - by Pool Dawg

The Break - by Billiards Colostate

Chapter 6: How To Become The Master Of The Backspin

To screw back or “back-spin” you don’t need to hit the ball as hard as possible, it’s all about timing. The steps should be as follows:

  • Put your bridge hand on the table, make sure it’s as flat as possible
  • Push the tip of the cue to the cue ball, it should align with the bottom of the ball
  • Pause
  • Pull back
  • Pause
  • Accelerate the cue forwards and hit the bottom of the cue ball

As previously mentioned in the bridging chapter, make sure your bridge hand is correct. You need to gradually accelerate through in a straight line and hitting the cue ball at the bottom. You need to also ensure you push the cue forwards and through the shot. This stops the chance of you giving the cue ball air which isn’t the goal. Prepare the tip and cover the entire tip with chalk so you can get the grip required.

Video Guide:

Additional Resources:

A Guide To The Backspin - by Pool Dawg

How To Play Advanced Pool Shots - by Video Jug

The Draw Shot - by Easy Pool Tutor

Chapter 7: Top-Spin Masterclass

Playing the top-spin is harder than the back-spin. The cue needs to hit higher on the cue ball so this requires your knuckles up and palm anchored to the table. Once you have the angle aligned you need to strike the cue ball at the top giving it the forward momentum it needs.

You should follow through once you make contact with the cue ball but be careful as once the cue ball hits the ball it will stop temporarily before moving forwards again. You should hit the shot with gradual acceleration and push the cue to the distance between the cue and the target ball, this gives you a rough estimate on how much cue to push through. You don’t want to hit the cue ball the second time when it hits the target ball.

Video Guide:

Additional Resources:

The Follow Shot - by Billiard World

Effective Use of Spins - by Terry Griffiths

How to Top-Spin - by Billiards Digest

Chapter 8: Be In Command With Perfect Positioning

Planning your shots is vitally important. To the average amateur pool player, there is no planning. The player simply hits the easiest shot and moves to the next without planning 2-3-4 shots down the line.

Getting rid of stray balls at the end of the table is a good starting point to improve your positioning. Doing this means you can play the rest of the game at the other end of the table where most of the balls are. If they are evenly spread you should try planning the entire frame using back-spin, front-spin and bridging correctly to clear up the balls nicely after the break.

Video Guide:

Additional Resources:

Position Play - by Billiards Colostate

Advanced Position - by Easy Pool Tutor

Principles of Position Play - by My Pool Blog

Chapter 9: How To Master The Rail Shot

The rail shot is difficult. A rail shot is when the target ball is tight to the cushion and you wish to hit it down the cushion into the pocket. It’s a skilled shot but you’ll often play this kind of shot each game as the pool table is small and many balls do end up on the cushion.

Watch the video below with Gareth Potts showing how to improve your rail shots. Again, it’s about timing and precision more than power. The target ball needs to drop into the pocket, if it’s hit too hard it may bounce around the mouth and bounce out.

Video Guide

Additional Resources:

How To Cut Rail Shots - by Billiards.About

Rail & Pocket Shots - by Easy Pool Tutor

Rail Shots - by Pool Clinics

Chapter 10: How To Avoid The Biggest Pool Mistakes

Mistake 1: Playing One Shot At A Time

Hitting the easiest pot isn't always the best shot. Planning means you can plan and dominate the frame. If you play one shot at a time you won’t foresee hard and sometimes near impossible shots you put yourself in deeper into the game.

Mistake 2: Not Standing And Aligning The Shot Correctly

If you stand or align incorrectly, it doesn’t matter how straight you hit the shot, you’re in the wrong place and will hit the wrong shot. Aligning the shot is important, make sure you eye it up correctly and practise alignments and shots. Watch the video below with Gareth Potts on how he practises aligning and standing before shots.

Video Guide:

Additional Resources:

Top 5 Mistakes - by Pool & Billiards

5 Billiards Mistakes - by Pool Dawg